
| Table of contents |
PWTK is written in Tcl (and uses tcllib, tclreadline, tcl-thread) but it is recommended to also install also xcrysden, Gnuplot, Open Babel, Emacs, and wget packages.
Depending on the GNU/Linux distribution, these packages can be installed as:
For Debian-based distros:
sudo apt install tcl tcllib tcl-tclreadline tcl-thread openbabel emacs gnuplot-qt wget xcrysden For Fedora-based distros (no xcrysden here):
sudo dnf install tcl tcllib tcl-tclreadline tcl-thread openbabel emacs gnuplot wgetFor openSUSE-based distros (no tclreadline and xcrysden here):
sudo zypper install tcl tcllib openbabel emacs gnuplot wgetFor other distros, install the packages analogously using the distro’s package manager.
Obviously, PWTK also needs Quantum ESPRESSO (QE). If it is not already installed, here is a quick way to install it for Debian-based distros:
sudo apt install quantum-espressoFor other GNU/Linux distros, QE can be installed analogously using the corresponding package manager.
(N.B. quantum-espresso in Debian is version 6.7, and its
ev.x program has a bug: it incorrectly calculates a
lattice parameter)
To make editing of PWTK scripts and Quantum ESPRESSO (QE) input files easier, let’s also install QE-emacs-modes, i.e.:
cd /tmp
wget http://pwtk.ijs.si/download/QE-modes-7.3.1.tar.gz
tar zxvf QE-modes-7.3.1.tar.gz
cd QE-modes-7.3.1
./install.sh
This installs QE-emacs-modes in
~/.emacs.d/qe-modes/. To activate QE-emacs-modes in Emacs, include the
content of the qe-modes.emacs file into the
~/.emacs file using an editor of your choice.
Alternatively, from the terminal, this can be achieved by:
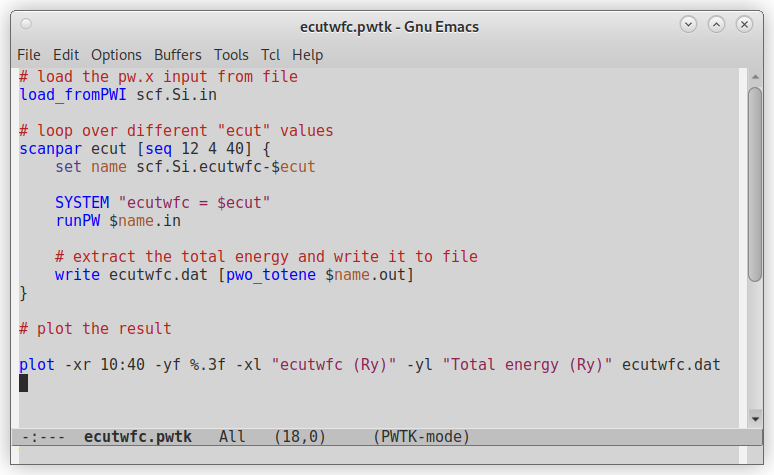
cat qe-modes.emacs >> ~/.emacsQE-emacs-modes are now ready to use. This is what you get when opening a PWTK script with Emacs:

PWTK requires no compilation. Once the above prerequisites are installed, just download and unpack it.
Lets install it in ~/src directory, i.e.:
mkdir -p ~/src
cd ~/src
wget http://pwtk.ijs.si/download/pwtk-3.0.tar.gz
tar zxvf pwtk-3.0.tar.gz
We need to add the location of the installed PWTK
(e.g. $HOME/src/pwtk-3.0) to the PATH
enviromental variable, i.e., add the following line into the
~/.bashrc file:
export PATH=$HOME/src/pwtk-3.0:$PATHNow open a new terminal and type:
pwtk -hwhich prints the usage message:
NAME
    pwtk - a Tcl scripting interface for Quantum ESPRESSO

SYNOPSIS
    pwtk [OPTIONS] [FILE]

DESCRIPTION
    FILE is the name of the pwtk scipt to run (if FILE is -, pwtk
    reads the script from stdin). With no OPTION and no FILE, pwtk
    enters the interactive mode.

OPTIONS
    -h
    --help
         print this usage message

    -i
    --interactive
         run PWTK interactively
    ...
Let’s try if PWTK works as it should. Type in the terminal:
pwtkThis enters the PWTK interactive prompt. Type:
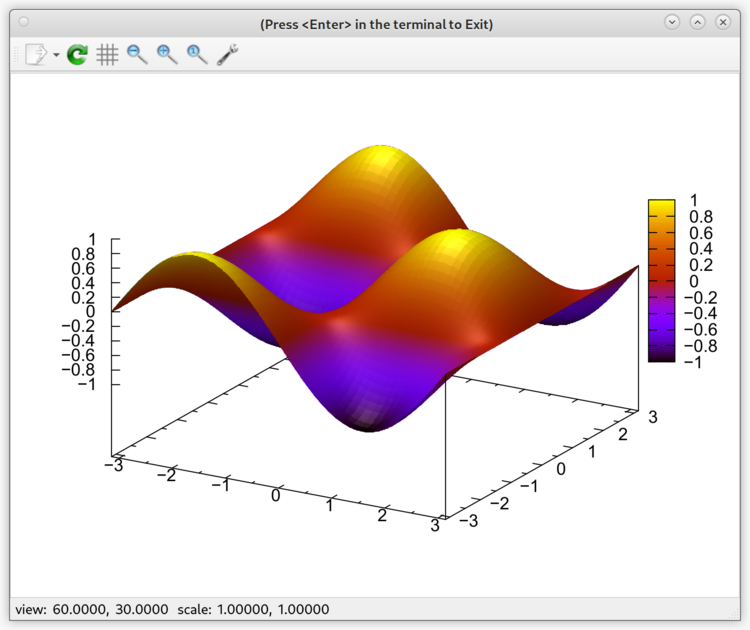
splot -xr -pi:pi -yr -pi:pi sin(x)*cos(y)The following plot should appear:

To exit from the PWTK, close
the plot (e.g. press Enter in the terminal) and type
exit.
It is a good idea to (at least) minimally configure PWTK to inform it of the location of
QE exacutables and
how to run them. The main user configuration file is
~/.pwtk/pwtk.tcl, which can be created as follows:
mkdir -p ~/.pwtk
cd ~/.pwtk
cp ~/src/pwtk-3.0/config/pwtk_simple.tcl pwtk.tcl
Here, we used the pwtk_simple.tcl template from the
PWTK’s config/
subdirectory (remember that we installed PWTK in ~/src/pwtk-3.0).
On a laptop or desktop computer, we can edit the
~/.pwtk/pwtk.tcl file to look something like:
# how to run executables (prefix)
# (this snippet auto-detects the number of available processors)
try {
    set np [exec nproc]
    while { [catch {exec mpirun -n $np echo yes}] && $np > 1 } {
        set np [expr { $np > 2 ? $np / 2 : 1 }]
    }
    if { $np > 1 } {
        prefix mpirun -n $np
    }
}

# directory containing the QE executables (bin_dir);
# needed only if QE executables are not on $PATH

bin_dir $env(HOME)/bin/qe-7.3.1; ## EDIT THIS

# directory containing pseudopotentials (pseudo_dir);
# needed only if 'pseudo_dir' != $HOME/espresso/pseudo
# and the ESPRESSO_PSEUDO environment variable is undefined

pseudo_dir $env(HOME)/pw/pseudo; ## EDIT THIS

# scratch directory (outdir)
# (e.g. outdir == outdir_prefix/outdir_postfix)

outdir_prefix  /tmp/$env(USER)/QE
outdir_postfix [pid]
With such a config, the number of available processors on the
computer is auto-detected, and the prefix is set
accordingly to mpirun -np $np. With
bin_dir and pseudo_dir, we instructured PWTK of the location of QE executables and
pseudopotential files, whereas with outdir_prefix and
outdir_postfix, we set the default location for the
scratch files. This allows us to avoid defining the
pseudo_dir and outdir QE variables in PWTK scripts.
Remark: On HPC machines, the content of the
~/.pwtk/pwtk.tcl is likely different because there one
typically uses modules or containers and submits job to queues,
implying that bin_dir and prefix can be
avoided in ~/.pwtk/pwtk.tcl.
PWTK supports the Slurm, LSF, PBS, and Load-Leveler job schedulers. The below configuring example is for Slurm; for other job schedulers, the configuration is analogous.
To configure PWTK to use Slurm, a user should define
Slurm profiles in the ~/.pwtk/slurm.tcl configuration
file; for other job schedulers the respective files are
~/.pwtk/lsf.tcl, ~/.pwtk/pbs.tcl, and
~/.pwtk/ll.tcl. Templates for these files are available
in the PWTK’s config/ subdirectory (remember we
installed PWTK in
~/src/pwtk-3.0); hence:
cd ~/.pwtk
cp ~/src/pwtk-3.0/config/slurm.tcl .
Now, edit the slurm.tcl file with an editor of your
choice. A user should defined at least the default
profile. Here is an example of two user defined Slurm profiles, named
default and small:
slurm_profile default {
    #!/bin/sh
    #SBATCH --nodes=1
    #SBATCH --ntasks=16
    #SBATCH --time=6:00:00
    #SBATCH --partition=parallel
} {
    prefix mpirun -np 16
}

slurm_profile small {
    #!/bin/sh
    #SBATCH --nodes=1
    #SBATCH --ntasks=4
    #SBATCH --time=00:30:00
    #SBATCH --partition=long
} {
    prefix mpirun -np 4
}
The usage of slurm_profile is:
slurm_profile profileName slurmDirectives ?pwtkDirectives?
where the last pwtkDirectives argument is optional. Its
purpose is to provide to PWTK a
default way of how to run executables. For example, the above
small profile requests 4 tasks, hence it is reasonable to
run executables with mpirun -np 4.
In addition to #SBATCH directives, also
module commands can be specified in the profile.
However, it is recommended to specify modules with the
slurm_head command because slurm_head
applies to all defined Slurm profiles, e.g.:
slurm_head {
    module load QuantumESPRESSO/7.1-foss-2022a; ## EDIT THIS
}
Now, we are ready to submit our first PWTK script to Slurm. Go to some temporary
directory (e.g. ~/tmp) and copy the
scf.Si.in file from $PWTK/examples (in our
case, the value of $PWTK is
~/src/pwtk-3.0), i.e.:
mkdir -p ~/tmp
cd ~/tmp
cp ~/src/pwtk-3.0/examples/scf.Si.in .
Let us now create a simple PWTK
script (say ex1.pwtk) that will load the
scf.Si.in input file and perform the
pw.x calculation, e.g.:
emacs ex1.pwtkand write the following two lines in the editor:
load_fromPWI scf.Si.in
runPW scf.Si.in
where load_fromPWI
loads the scf.Si.in input file into PWTK and runPW
performs the pw.x calculation. After saving, we can
submit the ex1.pwtk script as:
pwtk --slurm=small ex1.pwtkwhere the --slurm=small option requests submission
to Slurm queue using the
small profile defined above. We get the following
printout:
      ========================================================================
      *** PWTK-3.0    (PWscf ToolKit: a Tcl scripting environment)
      ========================================================================
      (for more info about PWTK, see http://pwtk.ijs.si/)

      Running on host: hpc-login1.arnes.si
      PWTK: /d/hpc/home/src/pwtk-3.0
      Date: Mon Apr 29 07:27:42 AM CEST 2024
      PID:  3087480


SLURM| ======================================================================
SLURM| *** running PWTK script within the SLURM batch queuing system
SLURM| ======================================================================

      batch PWTK script  :  ex1.slurm.1.pwtk
      batch PWTK log file:  ex1.slurm.1.pwtk.log
      batch profile name :  small
      batch PWTK script profile:

      prefix mpirun -np 4

      SLURM batch script:  ex1.slurm.1.sh
      Content of the SLURM script:

      #!/bin/sh
      #SBATCH --nodes=1
      #SBATCH --ntasks=4
      #SBATCH --time=00:30:00
      #SBATCH --partition=long
      module load QuantumESPRESSO/7.1-foss-2022a
      pwtk ex1.slurm.1.pwtk > ex1.slurm.1.pwtk.log 2>&1

      Running:   exec sbatch  ex1.slurm.1.sh &

      Job done.
      --
Now, we can check if the job was submitted to the Slurm queue, i.e.:
squeue -u $USERwhich returns something like:
             JOBID PARTITION     NAME     USER ST       TIME  NODES NODELIST(REASON)
          48961768      long ex1.slur    tonek  R       0:03      1 wn162
This implies we are ready to use PWTK to submit jobs to Slurm queues.
PWTK can be configured to use QE executables from a container. When using an Apptainer container, the QE executables would be run from the terminal as shown below with the annotated components:
apptainer exec /path/to/container.sif mpirun -np 16 pw.x -npool  2  -in INPUT > OUTPUT
  |                                |   |          |      |       |
  +----- container-----------------+   +--prefix--+      +postfix+
where /path/to/container.sif stands for the pathname
of the container image (say, $HOME/bin/qe-7.3.1.sif).
The corresponding PWTK
configuration for the above command line is:
container apptainer exec /path/to/container.sif
prefix    mpirun -np 16
postfix   -npool  2
IMPORTANT: when using containers, the querying of executables must be switched off, i.e.:
bin_query offotherwise, PWTK complains that
QE executables
cannot be found and refuses to run them. The corresponding
definition in the ~/.pwtk/pwtk.tcl configuration file
would be:
container apptainer exec /path/to/container.sif
prefix    mpirun -np 16

bin_query off
where postfix was omitted because it is case
specific. On HPC machines, the use of containers can be configured
in the corresponding job-scheduler profiles. For example, let us
reuse the above small Slurm profile, which in this
case would be:
slurm_profile small {
    #!/bin/sh
    #SBATCH --nodes=1
    #SBATCH --ntasks=4
    #SBATCH --time=00:30:00
    #SBATCH --partition=long
} {
    container apptainer exec /path/to/container.sif
    prefix    mpirun -np 4
    bin_query off
}
where /path/to/container.sif needs to be replaced
with the pathname of the actual container image.